Setting up Private Networking
This guide walks through setting up AuthZed Dedicated Private Networking.
Private networking is recommended, but optional. Authzed Dedicated can be configured to allow for connecting from the public internet.
AWS Steps
Onboarding
The customer success team at AuthZed should reach out about Private Networking during onboarding.
In the case where there’s any miscommunication, please reach out via Slack or schedule a call .
Creating a VPC Endpoint
AWS PrivateLink is the core technology involved in this process.
Log into the AWS web console for the account you plan to peer.
Navigate to VPC → Endpoints → Create Endpoint and input the following info:
| Option | Selection |
|---|---|
| Name tag | Choose whatever you want |
| Service category | Select “Endpoint services that use NLBs and GWLBs” |
| Service name | Enter the “service name” provided to you by the AuthZed team |
| VPC | Choose the VPC from where you will deploy your SpiceDB client. DNS resolution for your SpiceDB cluster endpoint address will only be available from this VPC. |
| Subnets | You can deploy your VPC endpoint in one subnet per AZ. We recommend choosing all AZs where SpiceDB clients will exist. |
| IP address type | IPV4 |
| Security Group | Choose a security group that allows inbound port 443 traffic from your clients |
When you’re ready to create the new resource, click Create endpoint
Enabling DNS for the Endpoint
By default, VPC Endpoints do not have access to public DNS. This is a reasonable default for internal networking, but AuthZed publishes public DNS. In order to make connections from your systems resilient to changing IP addresses, we will enable it.
Navigate to the Endpoint that was just created, select Actions from the drop-down menu, and select Modify private DNS name from the next drop-down menu.
Check Enable for this endpoint and then click Save changes to persist this setting.
The diagram below explains how DNS resolution works with PrivateLink and AuthZed Dedicated.

Create a Permissions System
You can skip this section if you’ve already created a Permissions System.
- Login to your SpiceDB management console
- On the homepage, select
Add Permissions System - Configure your permission system to your liking and create it
Verify Connectivity
Ensure the next steps are executed on a machine that is in your internal network. This might be your local machine, if your corporate VPN is peered with your cloud networks otherwise you’ll probably have to create a container or EC2 instance in the network.
There are a variety of ways to interact with the SpiceDB API, but for this guide we’ll be using the official command-line client, Zed .
If you don’t already have zed installed, you can follow this guide.
For zed to connect to SpiceDB, we’ll first have to create an context named network-test for connecting to our locally forwarded port:
zed context set network-test example.us-east-1.aws.authzed.net:443 sdbst_h256_cef4fc239bf...With our context set, we’re free to make requests to our Permission System:
zed schema readIf all is successful, you should see your schema or an empty Permission System should have thrown an error:
code = NotFound
desc = No schema has been defined; please call WriteSchema to start
GCP Steps
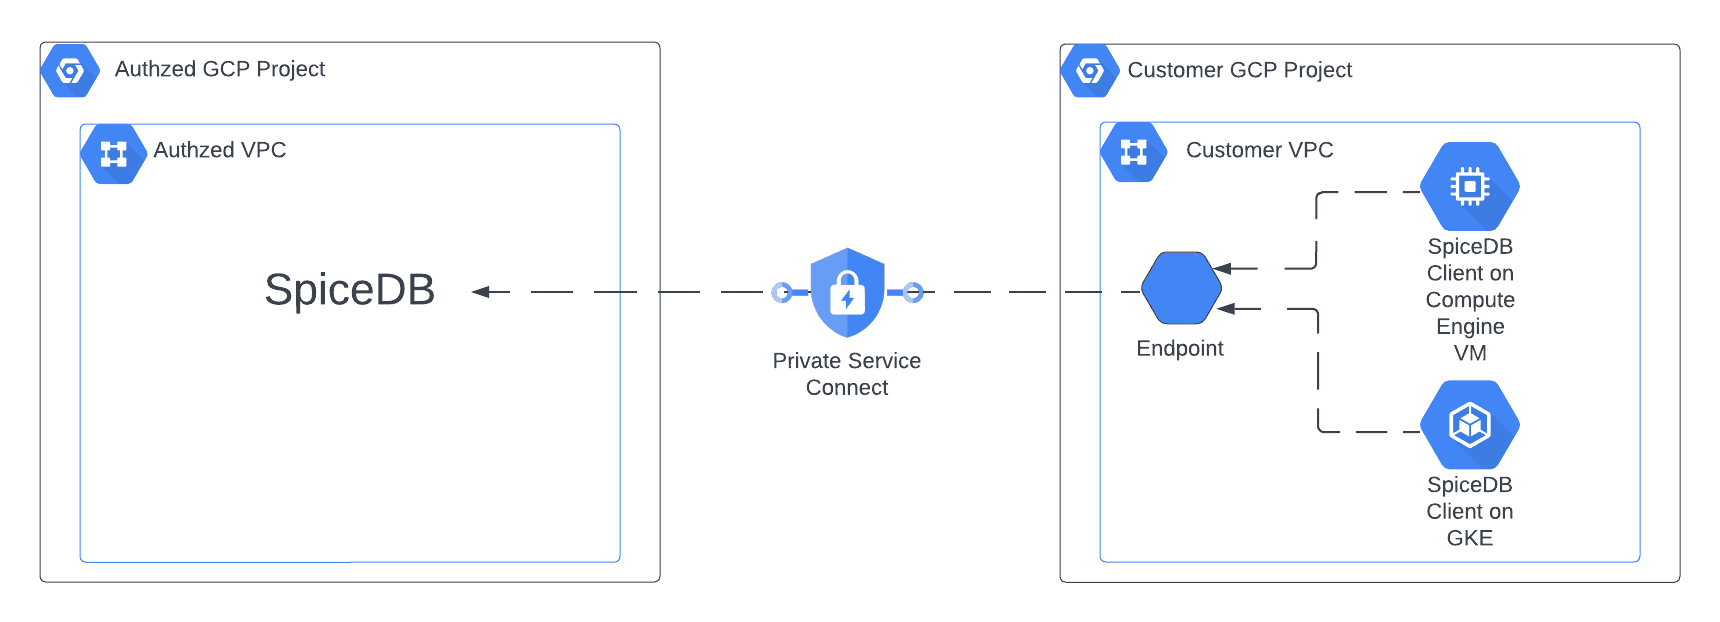
Most users of AuthZed Dedicated on GCP privately connect to SpiceDB with GCP Private Service Connect . Private Service Connect enables a private connection from your GCP Project and VPC to SpiceDB. Users of AuthZed Dedicated also have the option to configure SpiceDB to be accessed from the open internet.
Configure the VPC Endpoint
-
Navigate to “Private Service Connect” and make sure you are on the “Connected Endpoints” tab.
-
Click “Connect Endpoint”
Option Selection Target “Published service” Target service This will be provided to you by Authzed Endpoint name Name this whatever you want Network and subnetwork Select the networks you need connectivity from IP address Choose whatever IP you’d like
Enable DNS
-
Navigate to Cloud DNS and create a zone
Option Selection Zone type private DNS Name This will be provided to you by Authzed Networks Select the network where the Private Service Connect endpoint is deployed -
Add record set
Option Selection DNS name This will be provided to you by Authzed IP address Enter your Private Service Connect endpoint IP
Add Permission System
- Login to your SpiceDB management console
- On the homepage, select “Add Permission System”
- Configure your permission system to your liking and create it
- If you enabled Restricted API Access, configure it and provision a token. Otherwise, provision a token without FGAM
Verify Connectivity
Verify connectivity from client machine with the Zed CLI tool
zed context set permission_system_name example.com:443 sdbst_h256_123zed schema write example.yamlzed schema readThe last Zed command should display the schema to your terminal.
Azure Steps
Onboarding
The customer success team at AuthZed should reach out about Private Networking during onboarding.
In the case where there’s any miscommunication, please reach out via Slack or schedule a call .
Create an Azure Private Endpoint
Azure PrivateLink is the core technology involved in this process.
Login to the Azure Portal and go to the private endpoint page. Create a new private endpoint and select the following options:
| Option | Selection |
|---|---|
| Name | Choose a descriptive name for your private endpoint. |
| Connection method | Connect to an Azure resource by resource ID or alias. |
| Alias | Enter the alias provided to you by the AuthZed team. |
| Subnet | Choose the subnet where your SpiceDB clients will be deployed. |
| Network Security Group | If you use a NSG, configure it to allow inbound traffic on port 443 from your clients. |
Configure DNS
To access the private endpoint, you need to configure DNS resolution. This can be done by creating a private DNS zone in Azure.
Go to the private DNS zones page in the Azure Portal and create a new private DNS zone. Use the following settings:
- Set the name of the private DNS zone using the DNS name of your SpiceDB cluster which is available in the AuthZed Dedicated management dashboard.
- Create an A record for the root (@) in the private DNS zone that points to the private IP address of your private endpoint which was created earlier.
Now we need to link the private DNS zone to the virtual network where the private endpoint is located:
- Click on Virtual Network Links and then click Add.
- Name the link and select the virtual network where your private endpoint is located.
- Enable the option auto registration to automatically register DNS records for resources in the virtual network.
For more details on configuring Private Endpoints and DNS in Azure, refer to the Azure documentation .