
In a previous blog post we discussed how the Authzed Playground was originally built, including its support via the Monaco editor for the various custom languages used in configuring Authzed. Since the publication of that blog post, the Authzed Playground has gone through a number of improvements, including support for our newly released Schema Configuration Language.
The change from the old Protobuf-based text format to our new Configuration Language presented a unique opportunity: Could we make use of additional capabilities found in the Monaco editor to make the development experience even nicer for our customers?
Highlighting structure
The most common feature first added to any development or code testing environment is syntax highlighting.
As shown in the Learning Through Play blog post, syntax highlighting can be added to a Monaco editor via the use of a MonarchTokensProvider, which defines a set of regular expressions for categorizing text:
monaco.languages.setMonarchTokensProvider(DS_LANGUAGE_NAME, {
    tokenizer: {
        root: [
            [/definition/, { token: 'keyword.definition', bracket: '@open', next: '@definition' }],
            [/permission/, { token: 'keyword.permission', bracket: '@open', next: '@permission' }],
            [/relation/, { token: 'keyword.relation', bracket: '@open', next: '@relation' }],
            { include: '@whitespace' },
    ...
})
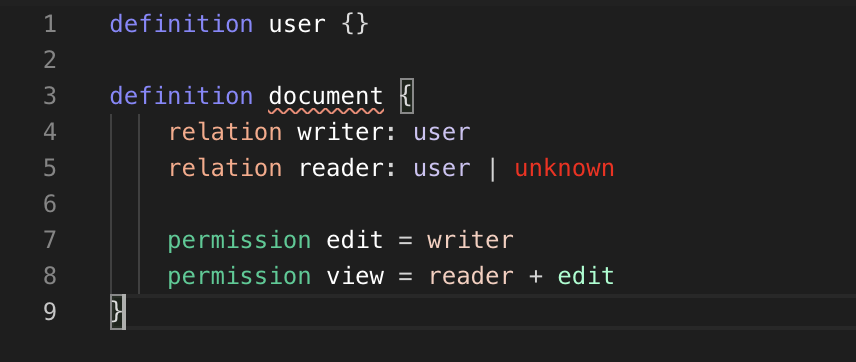
These regular expressions, when applied to an entered set of code, produce a colorful view which highlights important or distinct sections of the code:

Making a semantic argument
When developing the new Schema Configuration Language, the primary goal we had at Authzed was to make the development of permissions system both as safe and as powerful as possible.
As a result, the Schema Configuration Language introduced a number of new concepts, amongst them the difference between a relation (used to relate one object to another) and a permission (used to compute the result of one or more relations).
While this change has worked wonders for safety and readability, it did produce an issue: how do we differentiate in the Playground between relations and permissions in syntax highlighting?
The answer we found was: we could not.
Syntax highlighting, as its name implies, operates on the syntax (or structure) of the entered code.
By being based solely on structure, syntax highlighters are fairly easy to write and extremely quick to run, ensuring a good experience and useful feedback as a developer makes changes.
However, highlighting the configuration language solely based on its structure did not provide enough information for us to determine whether the referenced item is a relation or a permission; to do so, we would need to fully parse the semantics of the entered configuration.
Fortunately for us, Monaco supports this use case too!
Crossing the Semantic to Monaco ⛵
As we saw above, Monaco supports the registration of a MonarchTokensProvider for registering the syntax highlighting for a particular language.
Based on regular expressions, the syntax highlighter was able to cover the vast majority of the color determination necessary for the new Authzed configuration language.
However, in order to have a distinction between relations and permissions, we had to make use of a new provider in Monaco: DocumentSemanticTokensProvider.
As its name implies, the DocumentSemanticTokensProvider in Monaco handles providing of semantics for an entire entered document.
Unlike a tokens provider, instead of providing a set of regular expressions to tokenize the document, a DocumentSemanticTokensProvider implementation is a callback function: When invoked, the function is provided with the overall model containing the code entered by the user, and it is the responsibility of the implementor to return the necessary semantic information, requiring a full parse:
registerDocumentSemanticTokensProvider(DS_LANGUAGE_NAME, {
    provideDocumentSemanticTokens: function (model: ITextModel,
                                             lastResultId: string,
                                             token: CancellationToken): ProviderResult<SemanticTokens> {
Parsing the config
Fortunately for us, we had already written a full TypeScript-based parser (via the Parsimmon library) for the configuration language; our first step, therefore, was to add full text range information, including start and end index, on every node in the parse tree:
export interface ParsedNode {
  kind:
    | "schema"
    | "definition"
    | "relation"
    | "permission"
    | "arrow"
    | "relationref"
    | "binary"
    | "typeref"
    | "typeexpr";
  range: TextRange;
}

export interface TextRange {
  startIndex: Index;
  endIndex: Index;
}

export interface Index {
  offset: number;
  line: number;
  column: number;
}
We could then extend the Parsimmon parsing routines by the addition of Parsimmon.index to ensure we constructed the range on each node:
const definition: any =
    Parsimmon.seqMap(
        Parsimmon.index,
        seq(lexeme(string('definition')), path, lbrace.then(relationOrPermission.atLeast(0)).skip(rbrace)),
        Parsimmon.index,
        function (startIndex, data, endIndex) {
            return {
                kind: 'definition',
                name: data[1],
                range: { startIndex: startIndex, endIndex: endIndex },
                ...
            }
        });
With parse information now found on every node within the parse tree, we could then invoke parse in the semantics tokens provider:
monaco.languages.registerDocumentSemanticTokensProvider(DS_LANGUAGE_NAME, {
    provideDocumentSemanticTokens: function (model: editor.ITextModel, lastResultId: string, token: CancellationToken): languages.ProviderResult<languages.SemanticTokens> {
        // data is the data to be returned.
        const data: number[] = [];

        const text = model.getValue();
        const parserResult = parse(text);
        if (parserResult.error) {
            // Return nothing if parse error.
            return {
                data: new Uint32Array(data),
                resultId: undefined
            };
        }
Classifying the config
Our next step after parsing was to determine all of the references we wished to semantically highlight: here a simple walk of the parse tree was in order, to find any and resolve nodes of type reference:
    const resolution = new Resolver(parserResult.schema!);
    resolution.resolvedReferences().forEach((resolved: ResolvedReference) => {
        ...
    });
The Resolver is a helper class we built into the parser that provides easy methods for finding and resolving references in a single call.
With references now being both found and (if valid) resolved to the correct relation or permission, our next step was to indicate to Monaco how to classify them.
To do, we first need to discuss the Monaco semantics token format.
Solving the legend
The data format used by DocumentSemanticTokensProviders in Monaco is decidedly odd at first glance.
To begin, we must define a legend of token types to be returned by the provider:
    monaco.languages.registerDocumentSemanticTokensProvider(DS_LANGUAGE_NAME, {
        getLegend: function (): languages.SemanticTokensLegend {
            return {
                tokenTypes: [
                    'type', 'property', 'member', 'type.unknown', 'member.unknown'
                ],
                tokenModifiers: [
                    'declaration'
                ]
            };
        },
        ...
The legend consists of the types of tokens we intend to reference (tokenTypes), as well as any modifiers we might apply to those token types (tokenModifiers).
The token type strings defined here will be applied to the tokens based on the data returned in provideDocumentSemanticTokens, and our Monaco theme can reference them for defining the color and style to use for each.
Once we have our token types defined, our next step is to write the code in provideDocumentSemanticTokens to link a token with its corresponding token type.
Here is where the code gets somewhat... confusing.
The result of the provideDocumentSemanticTokens call is an object containing two fields: resultId and data. resultId can be left undefined (I believe it is used if you want to do partial processing), but data is where the semantically identified token types are returned.
Data format
The format of the data is a Uint32Array, with a set of elements forming a tuple representing a single token and its classification by the semantic highlighter.
The format of the token tuple is somewhat frustrating to work with:
- Line number (0-indexed, and offset from the previous line)
- Column position (0-indexed, and offset from the previous column, unless this is the beginning of a new line)
- Token length
- Token type index (0-indexed into the
tokenTypesarray defined ingetLegend) - Modifier index (0-indexed into the
tokenModifiersarray defined ingetLegend)
Note that there are no delimiters between these elements in the array; each "result" to be returned is added, one after another, with no differentiation made between them except the index within the array.
As an example, let's imagine the following text was entered into a semantics token provider, and we wished to highlight hello, great, and you:
hi hello great big world
how are you?
Given a legend defined like so:
getLegend: function (): languages.SemanticTokensLegend {
    return {
        tokenTypes: [
            'type', 'property', 'member'
        ],
        tokenModifiers: ['somemod']
    };
},
We would produce the following data array to represent the highlighting:
// Line 0, Col 3, Length 5, Token Type 0 (`type`), Modifier 0 (`somemod`)
00 03 05 00 00
// Line 0, Col 9 (+6 from previous), Length 5, Token Type 1 (`property`), Modifier 0 (`somemod`)
00 06 05 01 00
// Line 1 (+1 from previous), Col 8 (+8), Length 3, Token Type 2 (`member`), Modifier 0 (`somemod`)
01 08 03 02 00
Given the difficulty in creating the above data format, we decided to write a helper function for producing the data automatically based off of the normal line and column position information contained on our parse nodes:
let prevLine = 0;
let prevChar = 0;

// NOTE: lineNumber and colPosition are 0-indexed.
const appendData = (
  lineNumber: number,
  colPosition: number,
  length: number,
  tokenTypeIndex: number,
  modifierIndex: number
) => {
  data.push(
    lineNumber - prevLine,
    prevLine === lineNumber ? colPosition - prevChar : colPosition,
    length,
    tokenTypeIndex,
    modifierIndex
  );

  prevLine = lineNumber;
  prevChar = colPosition;
};
With this function available, we could now tie everything together to classify our references:
resolution.resolvedReferences().forEach((resolved: ResolvedReference) => {
    const lineNumber = resolved.reference.range.startIndex.line;
    const colPosition = resolved.reference.range.startIndex.column;

    if (resolved.resolvedRelationOrPermission === undefined) {
        appendData(lineNumber, colPosition, resolved.reference.name.length, /* property.unknown */4, 0)
    } else {
        switch (resolved.resolvedRelationOrPermission.kind) {
            case 'permission':
                appendData(lineNumber, colPosition, resolved.reference.name.length, /* property */1, 0)
                break

            case 'relation':
                appendData(lineNumber, colPosition, resolved.reference.name.length, /* member */2, 0)
                break
        }
    }
Our last step was to enable semantic highlighting within Monaco as it is, by default, off:
    options={{
            'semanticHighlighting.enabled': true,
    }}
With the semantic highlighting written and enabled, we now are able to produce a fully semantically highlighted configuration:
Try it now
Want to try the new semantic highlighting feature or have any questions? Visit the Authzed Playground to try some examples, or discuss in Discord. We hope it helps with the new configuration experience!
Additional Reading
If you’re interested in learning more about Authorization and Google Zanzibar, we recommend reading the following posts: