
The calm before the storm
The support ticket that came in seemed innocent enough: a user reported that a new feature recently released on your open source project was not working 100% as expected. As with all new tickets, the issue needed to be filed and triaged, so it fell to you to investigate the failure. You checked out the recent release, ran the feature that the user specified and… the sudden realization hit you like a proverbial ton of bricks falling from the sky: this wasn’t a normal bug, it was a security issue, and one that had real world consequences for the users of your software. As your heart starts to race and the adrenaline starts pumping, only one question enters your mind: What do you do now?
A real world example
This exact scenario occurred for me a bit over two weeks ago. We had just recently released SpiceDB version 1.3.0, with the new feature of Wildcard Permissions.
Immediately after release, the user, with whom we had developed the feature, noticed that they were receiving odd results.
SpiceDB resolves permissions via the use of set operations, and one API (LookupResources) was returning incorrect results when intersection was used along with wildcards.
At first glance, this appeared to be simply a result of a design decision made during development, but we quickly realized that the problem affected exclusion as well, turning it from a simple bug into a potential security issue.
Thus the Authzed team embarked on a journey to both remediate the first security issue reported on our open source project and to establish a formal process for doing so if necessary in the future.
GitHub Security Advisories
The first questions of our journey immediately came up: Can we get a CVE identifier for the issue and, if so, how? How do we alert any downstream dependencies of the issue so they can patch immediately if using the broken release? And, if necessary, how do we privately develop a fix and patch our production instances before public release on an open source project?
Fortunately for us, the answer to all of these questions appeared to be a part of the same system: GitHub Security Advisories. GitHub has built in support for creating, managing, remediating, and publishing security advisories, including support for a private fork. At first glance, by making use of a Security Advisory within SpiceDB, we would be able to not only develop the fix privately, but also publish the CVE and the fixed version to downstream dependencies, all from a single place! It seemed almost too good to be true… and while we did encounter some minor bumps, it was an otherwise smooth road.
Getting Started with Security Advisories
The first step in remediation of the security issue was to create a security advisory for the project.
Selecting the Security tab in our open source project, we were able to click on New draft security advisory to create the draft of our advisory:

At first glance, the advisory page can appear quite daunting (and a bit confusing). It shows a large number of fields around such items as Ecosystem, Severity and Common Weakness enumerator, etc.
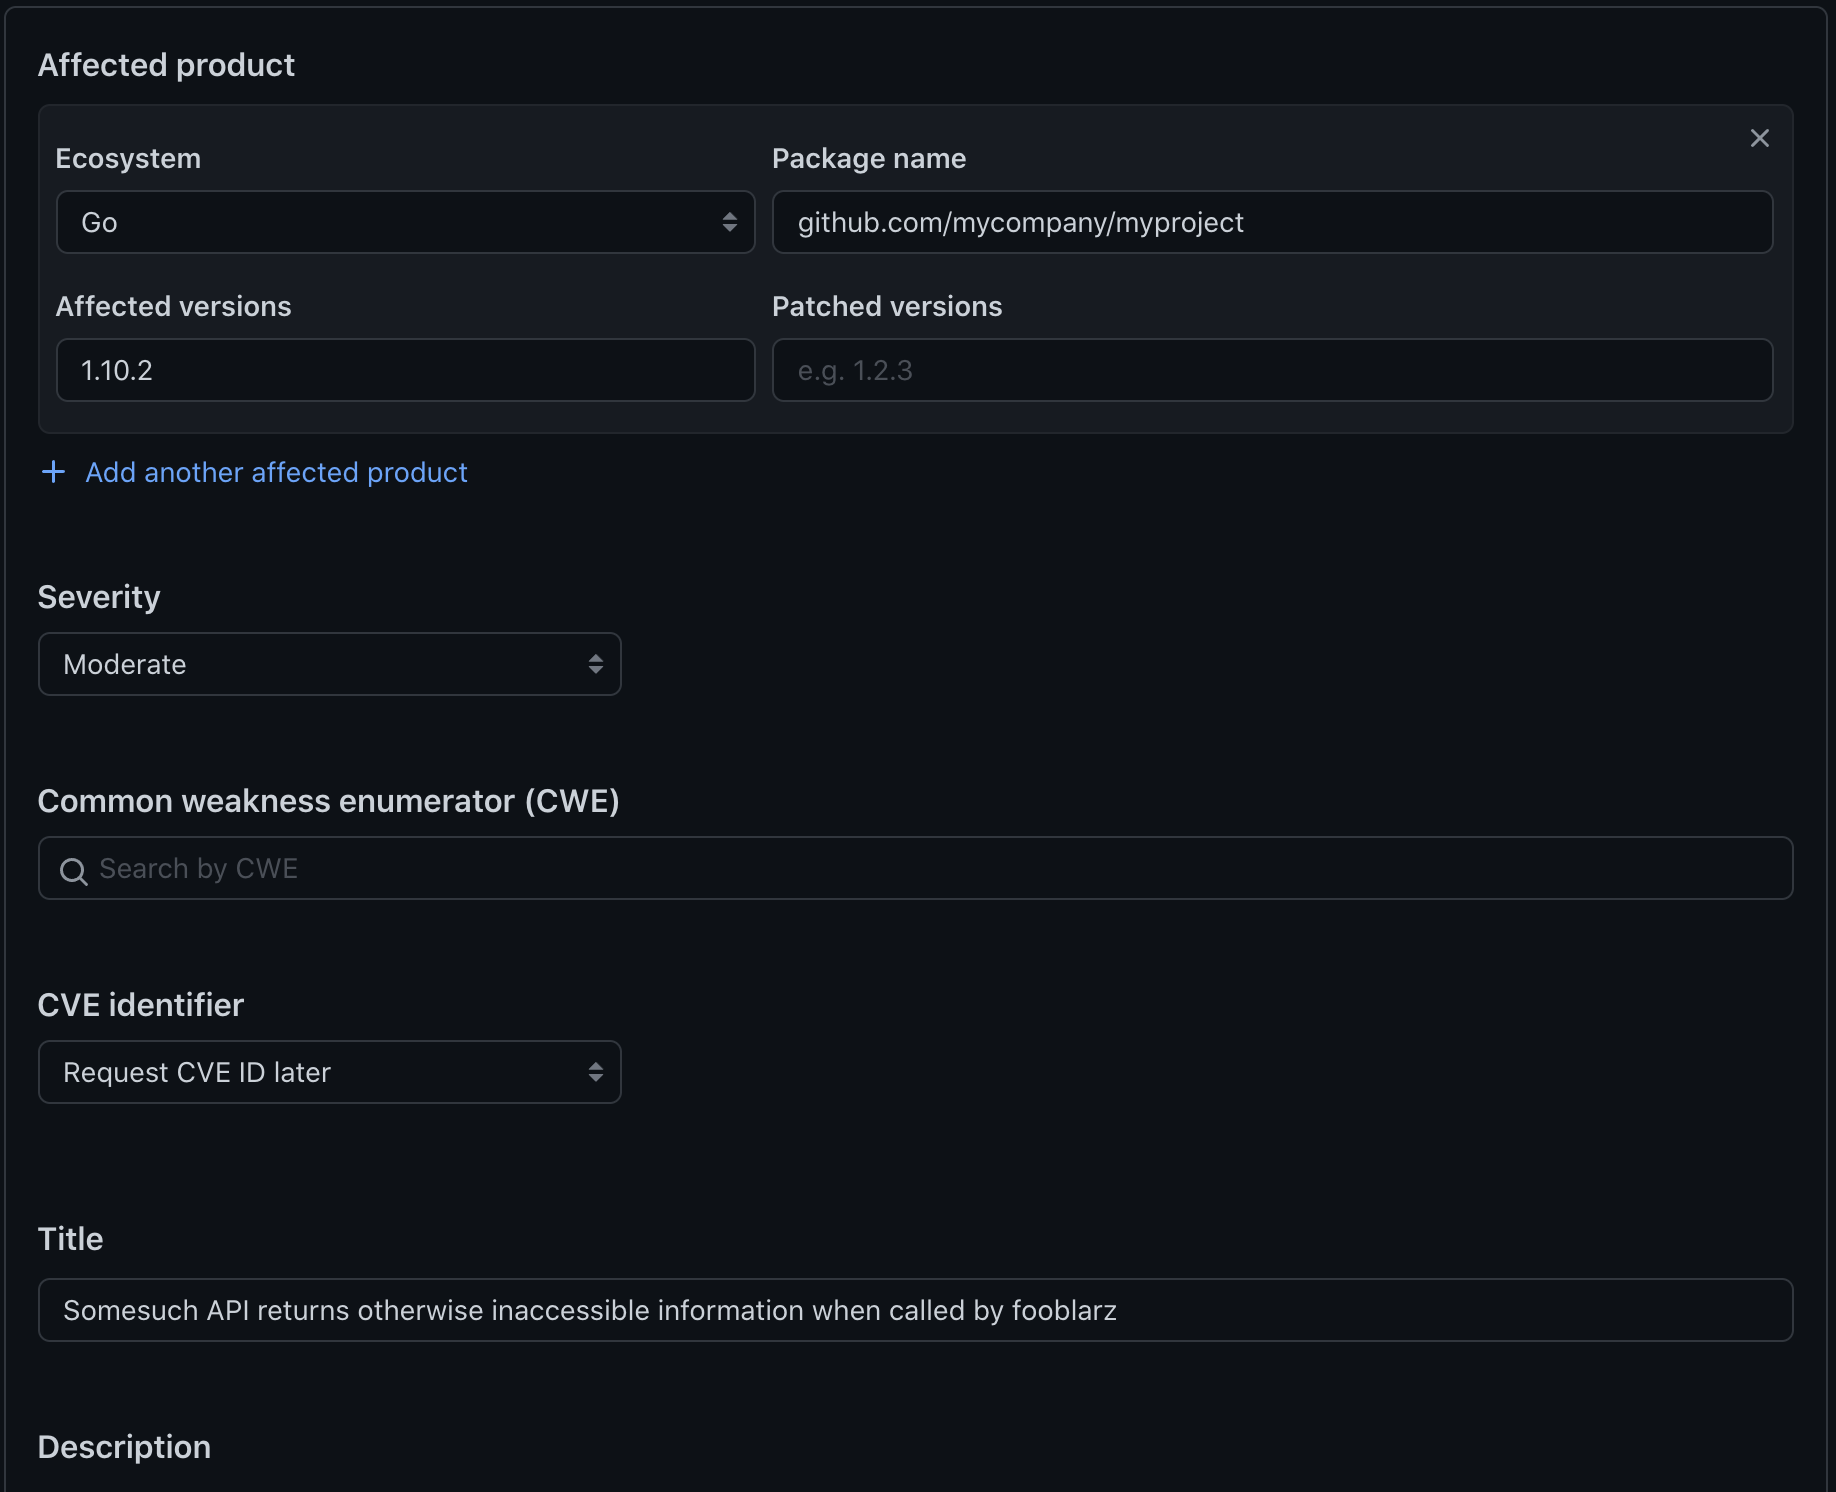
Fortunately, there are only a few fields that we immediately needed to fill out:
Ecosystem + Package Name
The first set of fields to fill out are the ecosystem and package name for your project.
In our case, SpiceDB is written in Go, so we chose Go and entered the package name github.com/authzed/spicedb into these fields.
Affected Versions
Important to the security advisory is the set of versions affected by the security issue. Providing an accurate range or set here is critical, to ensure users of the project know which versions need to be replaced. In some cases, however, it is not known at the time of creation the full range of versions that may be affected, which can mean giving a wider range and adjusting after the fact.
For SpiceDB, thankfully, the only version affected was v1.3.0, so we entered 1.3.0.
Patched Versions
The version range or set of version(s) that fixes the issue.
We did not yet have a fixed version, so we decided to leave this blank for the time being, although you could also put a “future” version in here.
Severity
The severity of the security issue is (mostly) up to the user: you need to judge how critical you feel the severity is and whether it warrants immediate (Critical, High) action on the part of users of your project, or if some delay is okay (Medium or lower).
If you feel that you are unable to simply judge the severity of the issue, you can select Assess severity using CVSS, which presents a grid for calculating a level in a more mathematical fashion.
For our issue, we performed the CVSS calculation and ended up with a calculated severity of Medium. However, we decided upon High, as it involved a computation within our core permissions API.
CVE Identifier
One of the first truly delightful surprises found when creating the security advisory was the ability for GitHub to publish a CVE on our behalf. GitHub is a CVE numbering authority which means they can publish CVEs on behalf of projects.
This means that by choosing Request CVE ID later we could request a CVE to be attached and published as part of our advisory, all without even leaving the GitHub UI!
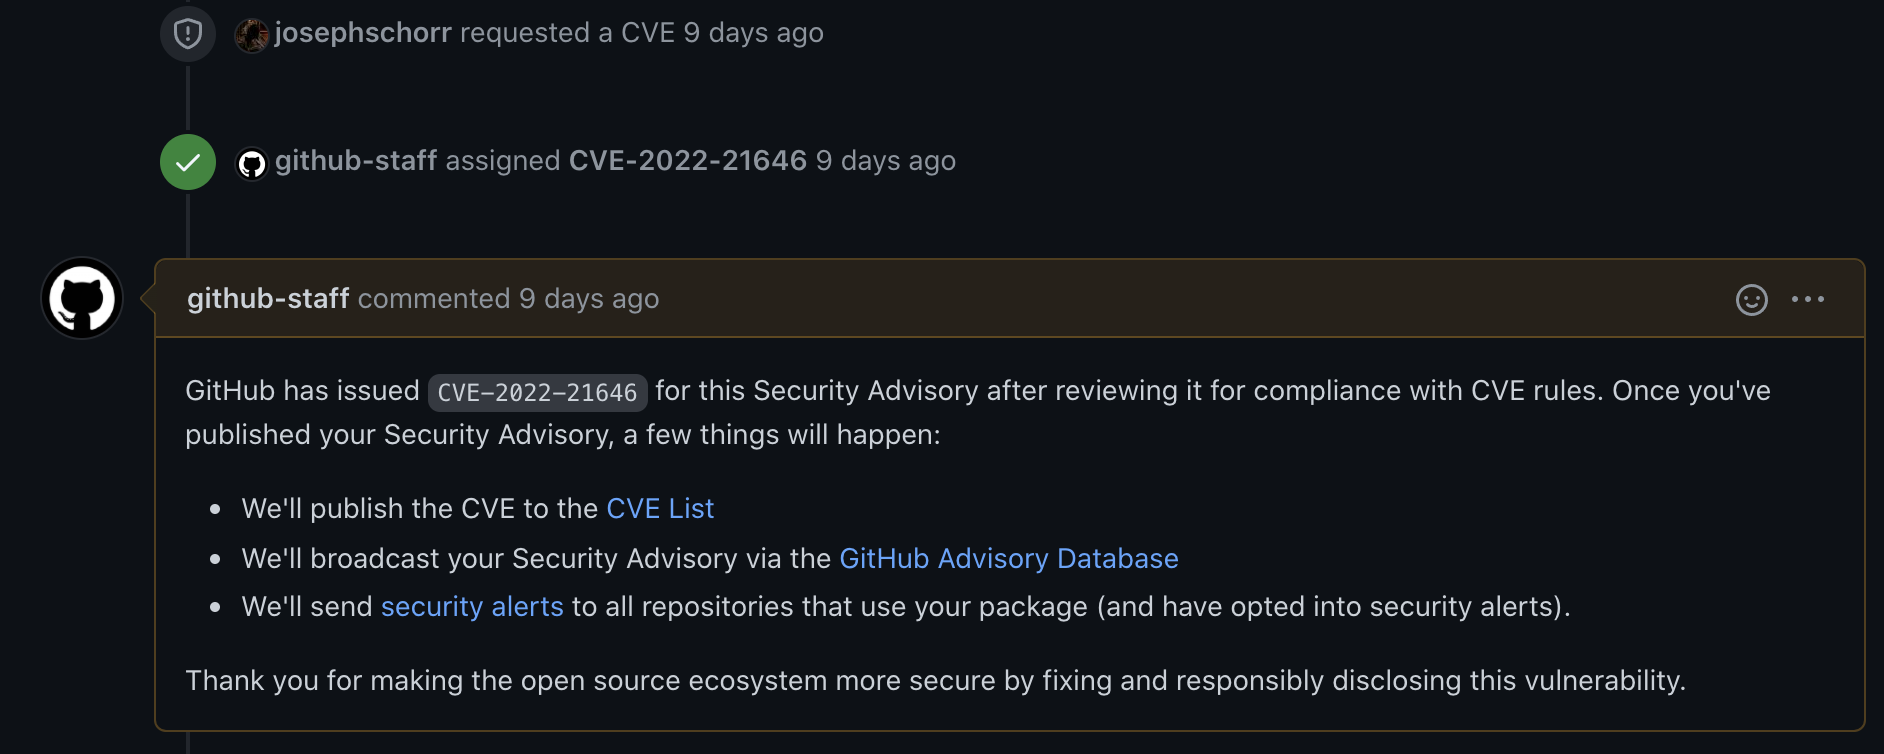
We chose to create a CVE identifier later (if you’re interested, the CVE we were granted is CVE-2022-21646). More on that process later.
Title and Description
The title and description fields of the security advisory are probably the most important fields entered.
The title should be a user-readable short summary of the issue at hand, ideally one that users can read at a glance and see whether it is applicable to them.
The description, on the other hand, should be detailed enough that any user that is interested can not only see the issue itself, but also derive temporary remediations or other actions they can take.
Fortunately, GitHub provides a pre-filled template for the description!
Note that at the time the advisory is first being created, you may not have all the necessary information to fill in the description. It is best to be as descriptive as possible in these fields for both yourselves and any external readers (more on that later); if you don’t have an answer for a particular question, leave a shortened answer or comment.
We entered as much detail as we had and then we created the draft security advisory by clicking on Create draft security advisory.
Developing our fix privately
With the draft security advisory created, we were presented with another major benefit of this system: the ability to have a private “fork” of our open source repository, allowing for development of the patched version behind the scenes.
To create the private fork, we clicked the “Start a temporary private fork” button:

The private “fork” created was unique in a few ways:
- It was named based on the name of our project, along with the advisory. In our case, it became
spicedb-ghsa-7p8f-8hjm-wm92 - Any branches developed within the private repository were automatically linked to the security advisory
- Any PRs issued in the private repository were visible only within the private repository, but would merge into the open source repository.
This particular point was hard to determine early on: we were initially concerned that even creating the PR would do so on the main (open) repository, but fortunately, it does not.
The above differences meant that extra care had to be taken when developing our fix.
Thus, we landed upon a set of development practices to prevent potential early release:
- Clone the private repository into a different local git repository, with the origin being the private repository
- Set a special remote for the public repository, but only if rebasing is necessary
- Explicitly specify the private repository on any
git pushcalls, even with the origin being set
With the private repository available, we were immediately able to set out on developing a fix, and having code review of the fix occur on the PR created within the repository. The security advisory also helpfully picked up our branch and PR, ensuring that it was visible both within the private repository and the advisory itself.
Testing within the private repository
Development of the fix for wildcard lookup proceeded at pace until we hit a roadblock: the private “fork” is a specialized private repository type designed explicitly for security advisories.
Unfortunately with this specialization comes a major issue: GitHub Actions will not run for any PRs within the specialized repository.

As we make use of GitHub Actions for our CI testing, this presented a conundrum: how do we ensure our fix passes CI before merging, when we need to merge to run CI?
The answer for us was found in a combination of manually running CI steps (go test -tags ci ./…) and act.
act is a project that can run GitHub Actions on your local machine, using Docker containers to simulate each machine that the GitHub Actions runner would assign.
Installing and running act was quite simple:
brew install act
From the root directory of our GitHub project:
$ act
[Build & Test/E2E               ] 🚀  Start image=ghcr.io/catthehacker/ubuntu:act-latest
[Lint                           ] 🚀  Start image=ghcr.io/catthehacker/ubuntu:act-latest
…
On the first run, act will ask which Docker container image “size” to use for running the steps.
Unless your GitHub Actions make use of specialized tooling, selecting medium will use an image with all the necessary dependencies to run most GitHub Actions.
NOTE: Make sure you have the most recent version of act installed. I found out that I had an older version only when it failed with a random node not found error
Publishing a CVE
With the fix for our security issue under development, the next step for us was to prepare to publish a CVE, so that upon release we could have an identifier for reference. Fortunately, as mentioned earlier, GitHub provides a means of requesting a CVE ID within the security advisory panel.
The first step in requesting a CVE was to ensure that our description of the security issue was as detailed as possible: the information found within the security advisory is used by the GitHub security team to fill in the CVE request.
Once done, our next and final step was to click the Request CVE button. After confirming that all information entered was correct, the request was sent to GitHub’s security team for a CVE to be filed.
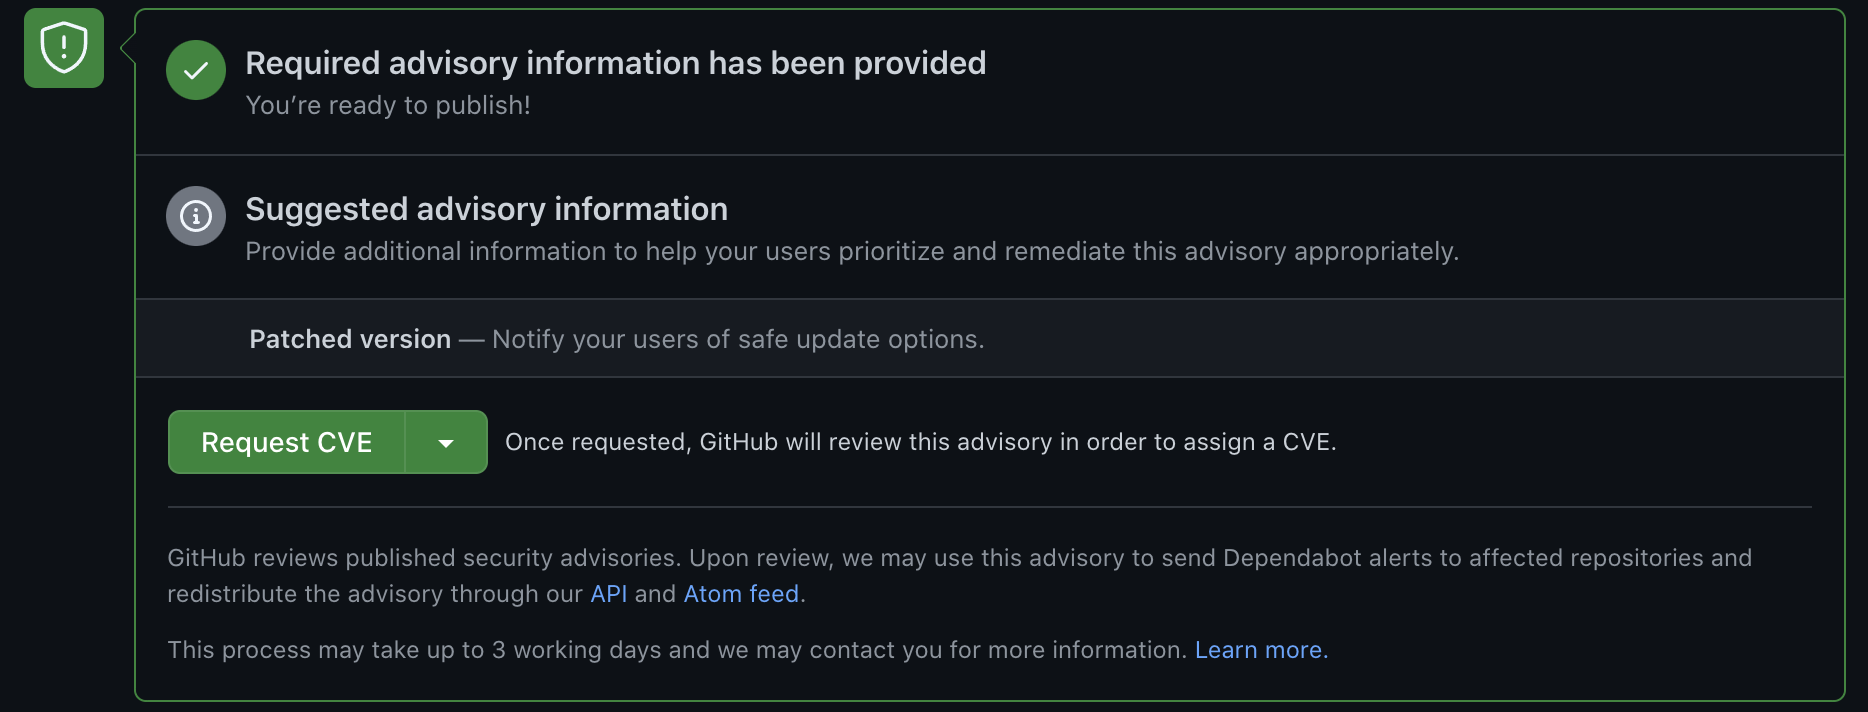
Interestingly enough, despite the documentation and UI saying that the CVE request could take up to three days, we received our identifier within the hour. Kudos to the GitHub security team for the quick response!
Deploying to production
Once review was complete, our next step was to deploy the fix to production. Deploying to production was critical to do before we published the advisory publicly, as any permissions system that had adopted wildcard support could be open to user action that could exercise the issue.
Authzed.com itself is deployed off of an internal monorepo which references our open source SpiceDB project as a dependency via a submodule. As SpiceDB is an open source project, we can include this submodule directly in our GitHub Actions for deployment. However, the private repository presented a challenge: we had to grant access to the private repository on our deployment actions.
As a result, we had to take a decent set of manual actions:
- Generate an internal token for access to the private repository
- Edit our GitHub Actions to make use of this token
- Change our
.gitmodulesto point the submodule at the private repository - Check out the fix commit
- Commit to the main monorepo repository
- GitHub Actions does the deployment
With the fix committed and deployed, we were then able to run final testing on stage before deploying to production.
Publishing the fix and advisory
Publishing the code fix
With the fix version now in production, we could now publish the fix by clicking Merge on the PR. This action merged the changes into the open source repository, after which we were able to go create a Release with the changes.
However, we noticed something odd about the generated release notes… the changes were not there!
It turns out that the merge of the PR containing our fix changes does not maintain the PR across repositories: the PR only existing within the private repository, and the commits were directly merged into the open source repository!
This means if you make use of the generated release notes feature in GitHub for your release, you must add the change manually to the notes. While this is a good idea in general (afterall, you should make it clear that the release fixes a security issue), it was quite surprising and we initially thought that our release was somehow missing the change!
Publishing the advisory
With the code release published, the next step was to place the version with the fix into the Patched Versions field, and then publish the security advisory
Publishing the advisory made it public on the repository, public in GitHub’s advisory tracker, and started the formal CVE publishing process for public display.
Once published, we were able to edit the GitHub issue to close it (since we did not have a PR that had done so), pointing to the security advisory.
Likewise, we pointed the Release to the advisory, and edited the Release for the previous version to indicate that it was insecure.
Final cleanup
With the security advisory published, the private “fork” repository was automatically closed... and deleted. Unfortunately, this now meant that our internal deployment pipeline was referencing a “dead” repository, so our final cleanup involved reverted the changes necessary to reference the private fork.
We did, however, leave in one change in our pipeline: If any branch is named with a special prefix in the future, it will automatically run GitHub Actions with the specialized GitHub secret token to check out a private repository, ensuring that the we do not need to change our deployment configuration in the future.
Process for the future
And thus ends the tale of SpiceDB’s first security mitigation. While we don't intend to use this feature frequently, it is good to know that our formalized security vulnerability process is (fairly) straightforward, thanks to GitHub’s Security Advisory system.
Want to discuss this process or permissions in general? Join us in our Discord server to get answers to your questions or just chat. Authzed engineers and a community of users are there to discuss and help!
Additional Reading
If you’re interested in learning more about Authorization and Google Zanzibar, we recommend reading the following posts: