
NOTE: This blog post makes use of
Zanzibar terminology and namespace configuration
. It will be updated in the future to match current Authzed terms and schema configuration
Building blocks (of authorization)
Developers and engineers are often tinkerers at heart. I myself started the journey to constructing applications by constructing castles out of blocks: the freedom to make changes quickly and see the results immediately (even if the result was often a partially collapsed edifice) helped me iterate my designs and learn how to build successfully. To this day my work often follows a similar pattern: begin by trying wildly different designs and prototypes, see where they succeed (and sometimes fail), and iterate, all the while learning.
At Authzed, we are constructing the modern authorization platform, providing the building blocks of authorization for applications. Like the blocks I used as a child, its components when used correctly form the foundations of powerful solutions. However, for any new technology to be used correctly, developers must have a way to tinker, test, and validate their designs before the final construction occurs.
We therefore asked ourselves: Could we provide a place where customers could safely create, edit, validate and share their namespace configurations, all without any software installation?
Warning: what follows is a deeply technical post detailing how we built the playground.
Picking the foundation
The first requirement for the playground was that developers could use the tool without having to install any software: This meant that the playground should be a web application, and ideally a Single Page Application, to minimize the number of server-side components.
Early on, we decided to standardize on a common foundation library for all our web applications, in order to maximize reuse and minimize the time needed to create a new app: Our internal application skeleton is built using React, TypeScript and Material UI, and provides most of the standard functionality we’ve found to be common across our web applications, including custom hooks for providing better UI and integrations with external services (more about these in a future post!).
Naturally, we started with this same foundation when constructing the playground, but we quickly ran into a bit of a conundrum: the Authzed API is provided by gRPC, which cannot be (directly) invoked from within the browser.
We wanted to leverage the power and experience of both our existing web application scaffolding and API implementation: how could we use both, without compromising?
A spider in the (gRPC) web
Searching, we quickly discovered the gRPC Web project, which provides both an implementation for generating JavaScript (and TypeScript) definitions for .proto files, as well as a proxy (grpcwebproxy) to translate calls from the generated code to our backing gRPC service. [Note: we have an updated fork that fixes a few issues]
Getting started with grpc-web proved to be fairly straightforward.
First, we installed its code generator plugin (we all have MacBook Pros, so these are the instructions for macOS):
$ sudo mv ~/Downloads/protoc-gen-grpc-web-1.2.1-darwin-x86_64 \
    /usr/local/bin/protoc-gen-grpc-web
$ chmod +x /usr/local/bin/protoc-gen-grpc-web
Next we ran the Protocol Buffer compiler with the --js_out and --grpc-web_out parameters, explicitly setting that we wished to generate definitions for TypeScript (import_style=typescript):
protoc -I=. developer.proto \
 --js_out=import_style=commonjs,binary:$OUT_DIR \
 --grpc-web_out=import_style=typescript,mode=grpcwebtext:$OUT_DIR
Finally, we were able to import the definitions in our TypeScript code to be used:
import {
  LookupShareRequest,
  LookupShareResponse,
  NamespaceContext,
  RequestContext,
  ShareRequest,
  ShareResponse,
  ValidateRequest,
  ValidateResponse,
  ValidationError,
} from "./developer_pb";
With a grpcproxyweb instance running, pointing to our gRPC backend, we were able to successfully invoke the API.
Building the sandbox
Now that we had a means of invoking an API from our TypeScript-based Playground application, we needed an API for the application that could mimic the validation provided by our production tooling, without requiring installation, setup, authentication or any other intermediate steps.
This API would be expressly tailored for developers, to provide the simplest call for validating the configurations provided in the Playground, and to run everything within a sandboxed version of the Authzed system, which could be quickly setup (and torn down) on a per-request basis.
We began with the definition of a ValidationRequest, which would take in the set of configurations for namespaces, the tuples to place into the sandboxed environment, and finally the set of relations to validate:
message NamespaceContext {
  string handle = 1;
  string config = 2;
}

message RequestContext {
  repeated NamespaceContext namespaces = 1;
  repeated RelationTuple tuples = 2;
}

message ValidateRequest {
  RequestContext context = 1;
  string validation_yaml = 3;
}
Note the requirement that each NamespaceContext be provided with a handle: it is a unique named reference to that specific namespace in the request.
This is mirrored in the response, allowing callers to reference the namespaces they provided.
Next, we defined the response for the Validate call:
message ValidateResponse {
  message NamespaceInformation {
    string handle = 1;
    NamespaceDefinition parsed = 2;
    repeated ValidationError errors = 3;
  }

  repeated NamespaceInformation context_namespaces = 1;
  repeated ValidationError validation_errors = 2;
}
Here, it is important to note that we defined two sets of errors, one attached to each Namespace provided (in case the provided configuration doesn’t parse or its otherwise invalid), and a set of overall validation errors, provided in the scenario where the validation fails in some manner.
Errors themselves were defined with as much context information as we could extract (this becomes important later):
message ValidationError {
  enum Source {
    UNKNOWN_SOURCE = 0;
    NAMESPACE_CONFIG = 1;
    VALIDATION_TUPLE = 2;
    VALIDATION_YAML = 3;
  }

  enum ErrorKind {
    UNKNOWN_KIND = 0;
    PARSE_ERROR = 1;
    NAMESPACE_CONFIG_ISSUE = 2;
    DUPLICATE_TUPLE = 3;
    MISSING_EXPECTED_TUPLE = 4;
    EXTRA_TUPLE_FOUND = 5;
    UNKNOWN_NAMESPACE = 6;
  }

  string message = 1;
  uint32 line = 2;
  uint32 column = 3;
  Source source = 4;
  ErrorKind kind = 5;
  repeated string path = 6;
  string metadata = 7;
}
Finally, we defined the Validate API call, that could be used by the Playground frontend to perform the validation:
service DeveloperService {
  rpc Validate(ValidateRequest) returns (ValidateResponse) {}
}
This API, while simple, provided the complete validation experience necessary to power the playground.
A journey towards Monaco
Once we had both a solid API for validating the namespaces provided by developers, and a framework for invoked it via the playground, our next step was to provide a good experience for developers to create and edit both the namespaces and the tuples necessary for validation and verification.
Our web application skeleton framework already provided the majority of the UI components we needed via Material UI, but there was one glaring omission: a code editor.
Traditionally, code editing on the web had felt very second class compared to the power and features available in desktop IDEs. However, with the recent explosion in web-based technologies being used on the desktop via systems such as Electron, there has been a renewed interest in having web-based components with the same capabilities as those in traditional applications.
With the widespread adoption of VSCode (itself an Electron application), a new component has become available: Monaco Editor. Monaco is the code editor used in VSCode, including support for custom languages, automatic indentation, and error handling, making it a great choice for use in the playground.
Entry to Monaco
The first step necessary to integrating Monaco was to find a means of using it from within React. React has a virtual DOM and its own state management system, which makes integrating external stateful components a non-trivial task.
Fortunately, we were not the pioneers of such an integration, and as result there is the monaco-react library, which provides a simple to use <Editor> component:
<Editor
  height="60vh"
  width="80vw"
  defaultLanguage="javascript"
  value={initialValue}
  theme="vs"
  onChange={handleEditorChange}
/>
The interface provided by the editor is fairly straightforward: Attributes specifying the size provided by width and height (recommended to be based on vw and vh), the language to use for syntax highlighting the contents, the initial value of the code editor, the theme to use to style the tokens, and a handler to use when the contents of the editor change.
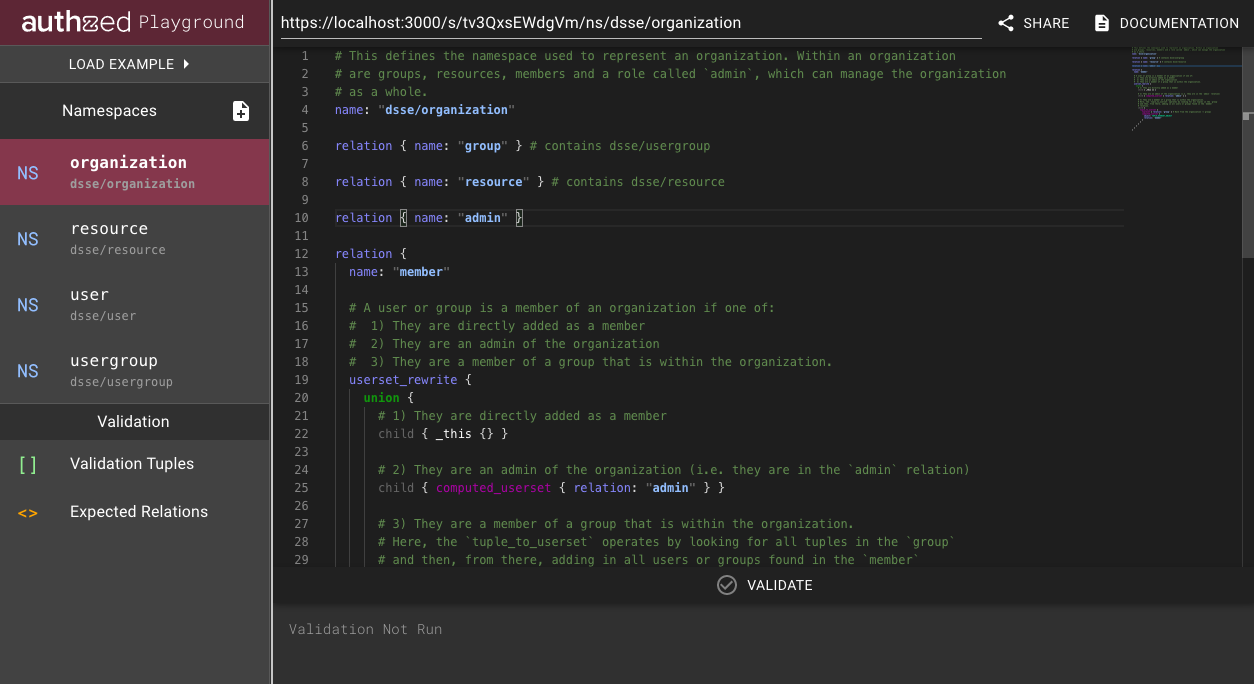
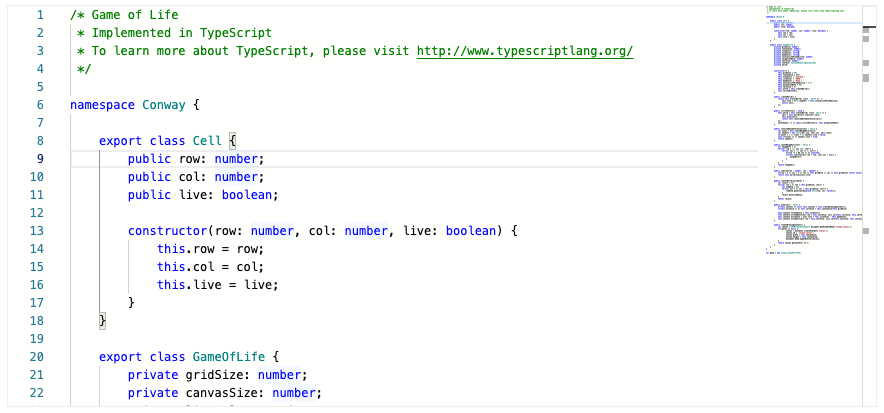
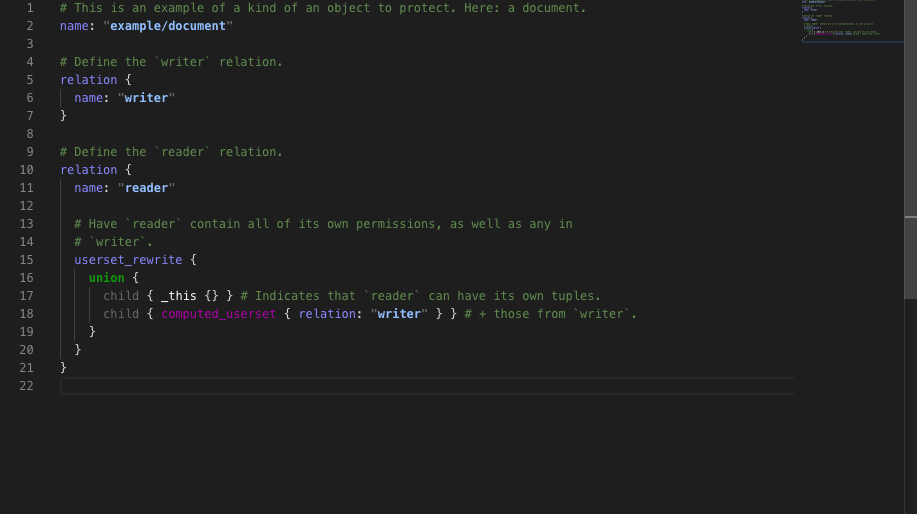
With the above, we were able to get a very simple editor working in minutes, and have it successfully display the configuration being edited.
Highlighting what’s important
We had the basic editor up and running, but the syntax highlighting for the namespace configurations was incorrect: the Authzed namespace configurations are written in the text format of the underlying Protocol Buffer messages, which Monaco did not support.
Our next step, therefore, was to configure Monaco to properly syntax highlight namespace configurations, by registering a new Monaco Language.
Monaco custom languages consist of a few components: A “Monarch” token provider, which parses the text found and produces a stream of tokens, a Theme which specifies how those produced tokens are styled, and an (optional) rich editor configuration, for providing additional semantics to Monaco to allow for capabilities such as automatic indentation.
[For more full examples, take a look at https://github.com/microsoft/monaco-languages]
To get started, we first defined the Monarch token provider, and defined a few tokens:
export default function registerNamespaceConfigLanguage(monaco: any) {
    monaco.languages.register({ id: NS_LANGUAGE_NAME });
    monaco.languages.setMonarchTokensProvider(NS_LANGUAGE_NAME, {
        tokenizer: {
            root: [
                [/[a-z_$][\w$]*/, {
                    cases: {
                        '@keywords': 'keyword',
                        '@child': 'child',
                        '@default': 'identifier'
                    }
                },
                   ... additional regexes here ...
            ],
        },
        keywords: [
            'name', 'relation', 'userset_rewrite', 'object'
        ],
        child: ['child'],
        ...
    })
}
In the above, we are telling Monaco that our tokenizer starts with root, and if it encounters an alphanumeric token, to first check the keywords list, then the child list, and finally, if not found there, fallback to marking the token as an identifier.
The @keywords indicates that the filter keywords (in the top level object) should be checked, and keyword indicates that the token should be named keyword.
Similar tokenizer rules were defined for other kinds of tokens (such as child being given its own token name of child).
Next, we needed to register a new theme to handle our custom token types:
export default function registerNamespaceConfigLanguage(monaco: any) {
    monaco.languages.register({ id: NS_LANGUAGE_NAME });
    monaco.languages.setMonarchTokensProvider(NS_LANGUAGE_NAME, {
        ...
    })

    monaco.editor.defineTheme(NS_THEME_NAME, {
        base: 'vs',
        inherit: true,
        rules: [
            { token: 'child', foreground: 'AAAAAA' },
            { token: 'keyword', foreground: '0a5ed7' },
            ...
        ]
   })
}
The call to defineTheme defines a new theme with the given name. Here, we inherit from the Monaco-provided “vs” theme, and then define rules for our token types: child should render in gray, while keyword should render with a striking color.
After this, we decided to register the optional rich editor configuration, to provide for automatic bracing and indentation:
export default function registerNamespaceConfigLanguage(monaco: any) {
    monaco.languages.register({ id: NS_LANGUAGE_NAME });

    monaco.languages.setLanguageConfiguration(NS_LANGUAGE_NAME, {
        comments: {
            lineComment: '#',
        },

        brackets: [
            ['{', '}'],
        ],

        autoClosingPairs: [
            { open: '{', close: '}', notIn: ['string'] },
            { open: '"', close: '"', notIn: ['string'] }
        ],

        indentationRules: {
            increaseIndentPattern: /{/,
            decreaseIndentPattern: /}/,
        }
    });

    monaco.languages.setMonarchTokensProvider(NS_LANGUAGE_NAME, {
        ...
    })

    monaco.editor.defineTheme(NS_THEME_NAME, {
       ...
   })
}
Finally, we needed to tell Monaco to make use of our registered language and theme.
Since we didn’t want the Monaco editor to render until the language and theme are registered, we added a useState to track the editor state:
const monacoRef = useMonaco();
const [monacoReady, setMonacoReady] = useState(false);

// Effect: Register the languages in monaco.
useEffect(() => {
    if (monacoRef) {
        registerNamespaceConfigLanguage(monacoRef);
        setMonacoReady(true);
    }
}, [monacoRef]);

...

{monacoReady &&
    <Editor
        height="60vh"
        width="80vw"
        defaultLanguage={NS_LANGUAGE_NAME}
        value={initialValue}
        theme={NS_THEME_NAME}
        onChange={handleEditorChange}
    />}
The useMonaco hook (provided by react-monaco) allows us to get a reference to the internal monaco editor instance, to pass to the language registration method we just wrote.
Error handling with Monaco
With the Monaco editor working, and properly syntax highlighting the namespace configurations (and other sections, for which we wrote other custom languages), the final step in our initial playground journey was to have the editor display error indicators wherever there was an error in the entered configuration.
Monaco makes displaying errors, warnings and other important information easy via the use of Markers, which can be configured to display a message on a specific range in the editor.
Unfortunately, this is where limitations appeared in react-monaco: Adding markers required accessing the underlying Monaco editor instance directly, which required keeping a reference to the editor.
To that end, we needed to add the onMount callback to our editor instance to store the reference via a useRef (so that it persists across renders):
import monaco from "monaco-editor-core";

const editorRef = useRef<monaco.editor.IStandaloneCodeEditor | undefined>(
  undefined
);

const handleEditorMounted = (editor: monaco.editor.IStandaloneCodeEditor) => {
  editorRef.current = editor;
};

{
  monacoReady && (
    <Editor
      height="60vh"
      width="80vw"
      defaultLanguage={NS_LANGUAGE_NAME}
      value={initialValue}
      theme={NS_THEME_NAME}
      onChange={handleEditorChange}
      onMount={handleEditorMounted}
    />
  );
}
Now that we had a reference to the editor, we were able to write the markers to Monaco whenever our state changed.
To do so, we made use of a React effect, which would run any time our local validation state had changed:
useEffect(() => {
    const markers: monaco.editor.IMarkerData[] = [];
    validationState.errors.forEach((ve: ValidationError) => {
        markers.push(
            {
                startLineNumber: ve.getLine(),
                startColumn: ve.getColumn(),
                endLineNumber: ve.getLine(),
                endColumn: ve.getColumn(),
                message: ve.getMessage(),
                severity: monacoRef.MarkerSeverity.Error
            }
        );
    });

    // Add additional errors.
    ...

    monacoRef.editor.setModelMarkers(editorRef.current.getModel()!, 'playground', markers);
}, [validationState, editorRef.current]);
Thus showing our errors inline:
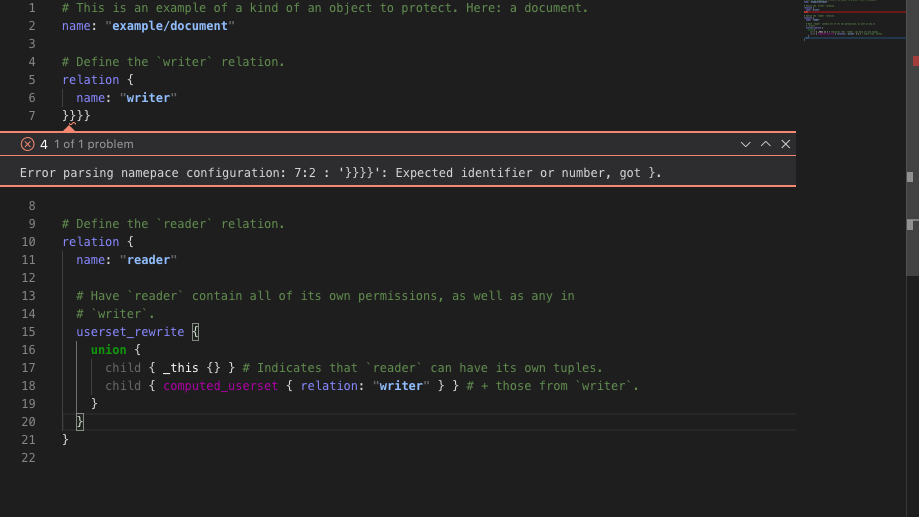
With the inclusion of automatic error displays, we now had a fully working playground that would allow a user to create, edit and validate their namespace configurations.
One final piece that should be found in every playground (virtual and real) was, however, missing: sharing.
Sharing is caring
Namespace configurations in Authzed provide high flexibility for developers to configure their permissions systems. Yet with that flexibility comes complexity, especially as permissions systems grow and expand.
Given the potential complexity involved, having sharing as a first class feature in the playground proved to be critical: it would allow developers to easily iterate on their configurations not only by themselves, but as well with coworkers and even with our team to help them rapidly produce a working model (shoutout: want help designing your permissions system? Speak with one of our engineers and we’ll help you).
Implementing sharing the playground proved to be a fairly direct process: The design we used was based roughly on that of the Go Playground, which provides a unique, hashed reference to the contents of the playground.
Adding to the API
The first step in adding sharing was to expand our developer API with two new endpoints: Share and LookupShare, which would provide the means for the playground to post contents to the sharing storage (Share) and lookup the contents (LookupShare);
service DeveloperService {
  rpc Validate(ValidateRequest) returns (ValidateResponse) {}
  rpc Share(ShareRequest) returns (ShareResponse) {}
  rpc LookupShared(LookupShareRequest) returns (LookupShareResponse) {}
}
The APIs themselves were defined as mirrors of one another:
message ShareRequest {
  repeated string namespace_configs = 1;
  string relation_tuples = 2;
  string validation_yaml = 3;
}

message ShareResponse {
  string share_reference = 1;
}

message LookupShareRequest {
  string share_reference = 1;
}

message LookupShareResponse {
  bool is_valid = 1;
  repeated string namespace_configs = 2;
  string relation_tuples = 3;
  string validation_yaml = 4;
}
When called, Share hashes the contents of the message, and stores the contents (by this hashed digest) in our storage layer, returning the digest as share_reference.
On call to LookupShare, the reverse operation is performed, with the contents of share_reference being returned to the caller (if valid).
Sharing the playground
Once the new sharing API was in place, the next step was to add code to handle the sharing operations on the frontend.
Invoking the API to share the contents was straightforward: it simply involved calling the Share API, and displaying a URL with the share_reference contained within (ala https://play.authzed.com/s/dawl3_fjcxaI/ns/example/document).
Loading and populating the playground from the shared URL proved to be a bit more of a challenge: The load needed to occur when the playground was first started, but gRPC Web calls are asynchronous, which meant that we could not “hold” the UI on the result of the call.
Once again, using a React effect was the answer: by registering an effect that occurs on path change, we were able to check the URL for a share reference, load the shared contents if found, and then update the state of the application accordingly:
const [isShareLoading, setIsShareLoading] = useState(false)

useEffect(() => {
   if (location.pathname.startsWith('/s/') && !isShareLoading) {
      setIsShareLoading(true);
      (async () => {
         const shareReference = (parse from pathname);
         const request = new LookupShareRequest();
         request.setShareReference(shareReference);

         service.lookupShared(request, {},
           (err: grpcWeb.Error, response: LookupShareResponse) => {
               // Handle share response here
               ...
           });
       })();
   }
}, [location.pathname, isShareLoading]);
With that, the playground was now able to be shared with anyone!
Try it now
Want to learn more about Authzed and how we manage permissions? There is now a handy playground you can use to try some of our example configurations such as RBAC and Google Docs-style Sharing.
Want to learn even more, or try Authzed out for your application? We’re onboarding design partners now!
Additional Reading
If you’re interested in learning more about Authorization and Google Zanzibar, we recommend reading the following posts: